
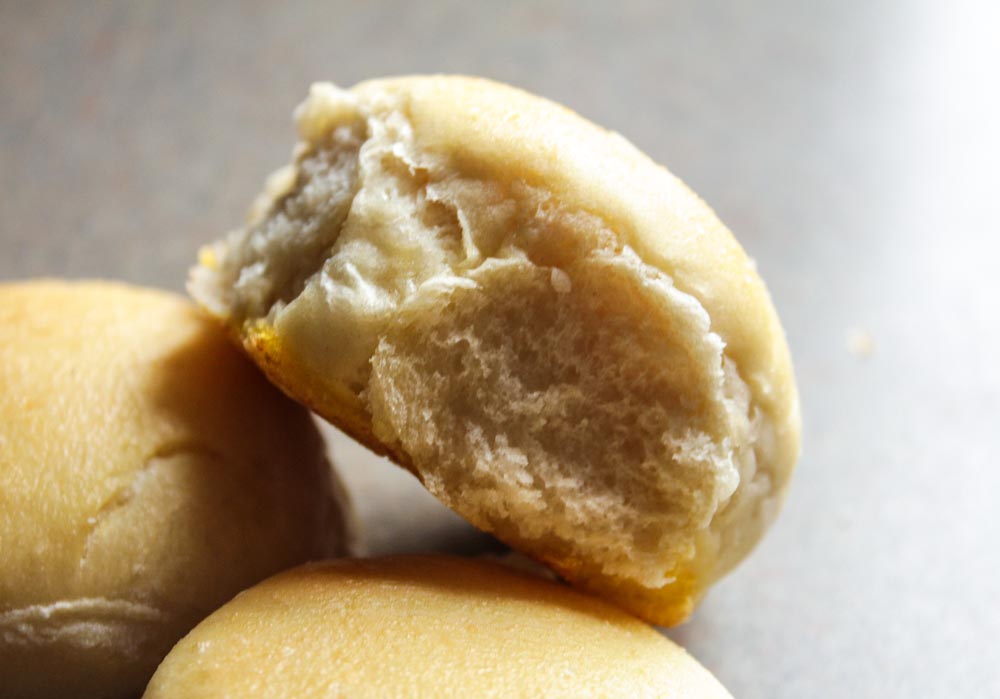
Brioche Slider Buns
For the last few months I’ve been looking for slider buns in my grocery store but they’re nowhere to be found! Then, I don’t know if you’ve noticed those awesome food videos being posted with you guessed it, slider buns! I said enough! I took the bull by the horns and I made my own slider buns. Brioche slider buns. Pillowy delicious brioche slider buns. So incredibly easy that I’m not even going to look in the stores for these bad boys anymore. Bake a big batch and freeze them, that way you can have homemade sliders in literally minutes 👍🏻😉
Makes 20-24 Buns
2 1/3 Cups whole wheat flour (or white All-purpose flour), plus more as needed
1 tsp salt
2 tbsp (salted) butter, softened
¾ Cup warm water
2 tbsp warm milk
1 ½ tbsp dry instant yeast
1 ½ tbsp sugar
2 (Large) eggs, divided
1 tbsp cold water
Combine the flour, salt and butter until the flour looks crumbly, like panko breadcrumbs.
Combine the milk and the water in a large measuring cup, or bowl if you don’t have one.
Stir in the yeast and sugar into the milk mixture.
Pour the liquid into the flour mixture.
Crack the egg into measuring cup that had the milk mixture, beat the egg and add it to the dough.
Knead until it comes together
You may have to add more flour, up to a 1/2 cup, one tbsp. at a time. It’ll be very soft but not sticking to your fingers anymore. When the sides of the bowl are clean then you’ve added enough flour (if using a stand mixer), if kneading by hand, the dough won’t stick to your hand anymore.
Cover with the bowl (with the dough inside) with a clean towel and set it aside to let the dough rise for 2 hours.
After 2 hours remove the dough from the bowl and place on a lightly floured cutting board.
Place the clean kitchen towel over the buns on the baking sheet and let the dough rise again for another 2 hours.
Roll the dough out until it’s a ½ inch thick and then cut it out using a 2-inch cookie cutter (I used a small glass with a 2-inch diameter).
Lay the circles on to a lightly greased baking sheet and allow them to rise for another two hours.
After the dough has risen the second time, preheat your oven to 350.
Whisk together the second egg and the one tbsp. of cold water.
When the oven is preheated and you are just about to put the buns in the oven, brush each one lightly with the egg wash. If you put the egg wash on the buns too early they will start to collapse from the weight of the egg wash.
Bake the buns for 10 to 12 minutes, until they are a dark golden brown.
Notes:
1.You can freeze half of the buns because they keep well in the freezer.
A super simple recipe for Brioche Slider Buns; pillowy delicious brioche slider buns. So incredibly easy you’ll love them 🙂

| Servings | Prep Time |
| 20-24 | 5 minutes |
| Cook Time | Passive Time |
| 12 minutes | 4 hours |
|
|
|
|
For the last few months I've been looking for slider buns in my grocery store but they're nowhere to be found! Then, I don't know if you've noticed those awesome food videos being posted with you guessed it, slider buns! I said enough! I took the bull by the horns and I made my own slider buns. Brioche slider buns. Pillowy delicious brioche slider buns. So incredibly easy that I'm not even going to look in the stores for these bad boys anymore. Bake a big batch and freeze them, that way you can have homemade sliders in literally minutes 👍🏻😉
|
- 2 1/3 Cups Cups whole wheat flour (or white All-purpose flour), plus more as needed
- 1 tsp salt
- 2 tbsp (salted) butter , softened
- 3/4 Cup warm water
- 2 tbsp warm milk
- 1 1/2 tbsp dry instant yeast
- 1 1/2 tbsp tbsp sugar
- 2 Large eggs , divided
- 1 tbsp cold water
- Combine the flour, salt and butter until the flour looks crumbly, like panko breadcrumbs.
- Combine the milk and the water in a large measuring cup, or bowl if you don’t have one.
- Stir in the yeast and sugar into the milk mixture.
- Pour the liquid into the flour mixture.
- Crack the egg into measuring cup that had the milk mixture, beat the egg and add it to the dough.
- Knead until it comes together
- You may have to add more flour, up to a 1/2 cup, one tbsp. at a time. It’ll be very soft but not sticking to your fingers anymore. When the sides of the bowl are clean then you’ve added enough flour (if using a stand mixer), if kneading by hand, the dough won’t stick to your hand anymore.
- Cover with the bowl (with the dough inside) with a clean towel and set it aside to let the dough rise for 2 hours.
- After 2 hours remove the dough from the bowl and place on a lightly floured cutting board.
- Place the clean kitchen towel over the buns on the baking sheet and let the dough rise again for another 2 hours.
- Roll the dough out until it’s a ½ inch thick and then cut it out using a 2-inch cookie cutter (I used a small glass with a 2-inch diameter).
- Lay the circles on to a lightly greased baking sheet and allow them to rise for another two hours.
- After the dough has risen the second time, preheat your oven to 350.
- Whisk together the second egg and the one tbsp. of cold water.
- When the oven is preheated and you are just about to put the buns in the oven, brush each one lightly with the egg wash. If you put the egg wash on the buns too early they will start to collapse from the weight of the egg wash.
- Bake the buns for 10 to 12 minutes, until they are a dark golden brown.
1.You can freeze half of the buns because they keep well in the freezer.
Leave a Reply